[Spring] @Controller, @Service, @Repository 어노테이션
[Spring] @Controller, @Service, @Repository 어노테이션
[Spring] context:component-scan과 @Component
Component-scan#
기존에 오래된 버전의 스프링으로 프로젝트를 진행했을때, 가장 어려운 점이 XML을 이용한 설정이였고, 그중에 생성한 Java 파일들이 Bean으로 사용할 수 있도록 각각 추가하여 설정하는 부분이 있었습니다.
application.xml
<?xml version="1.0" encoding="UTF-8"?>
<beans xmlns="http://www.springframework.org/schema/beans"
       xmlns:xsi="http://www.w3.org/2001/XMLSchema-instance"
       xsi:schemaLocation="http://www.springframework.org/schema/beans http://www.springframework.org/schema/beans/spring-beans.xsd">

  <bean id="testService" class="com.spring.test.TestService" />
  <bean id="testRepository" class="com.spring.test.TestRepository"/>

</beans>
component-scan은 이러한 일련의 작업을 드라마틱하게 줄여주는 기능입니다.
component-scan의 대상으로는

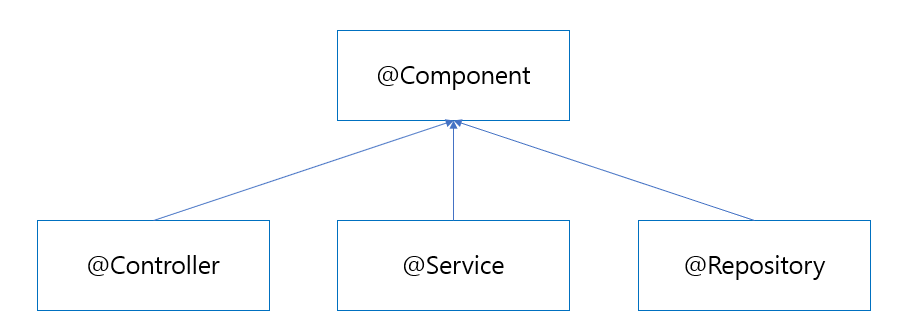
@Component를 포함하여 @Component를 상속 받는 @Controller, @Service, @Repository가 대상이 됩니다.
해당 어노테이션이 붙은 클래스들을 스캔하여 bean으로서 생성해주는 것을 가능하게 해주는 설정입니다.
component-scan은 XML에서의 설정과 Java에서의 설정 2가지 방법이 있습니다.
XML에서의 Component-scan 설정#
component-scan은 context xmlns(이하 xml namespace)에 정의되어 있는 접두어를 통해 사용 가능한데, 이때 위에서 언급하였듯이 어노테이션이 붙은 클래스들을 스캔하여 bean으로 만들기 위해서 base-package=“패키 지명"을 통해 스캔 범위를 정할 수 있습니다.
<context:component-scan base-package="패키지명"/>
application.xml
<?xml version="1.0" encoding="UTF-8"?>
<beans xmlns="http://www.springframework.org/schema/beans"
       xmlns:xsi="http://www.w3.org/2001/XMLSchema-instance"
       xmlns:context="http://www.springframework.org/schema/context"
       xsi:schemaLocation="http://www.springframework.org/schema/beans http://www.springframework.org/schema/beans/spring-beans.xsd http://www.springframework.org/schema/context https://www.springframework.org/schema/context/spring-context.xsd">

  <context:component-scan base-package="com.spring.test"/>

</beans>
XML에서의 Component-scan의 Customize#
설정한 Component-scan에 대하여 필터를 이용한 스캐닝의 커스터마이징에 대해서 살펴보겠습니다.
Customize이라는 것은 기본 적용된 설정을 수정하여 좀더 세부적인 설정을 하는 것입니다.
context접두어를 이용하는 component-scan의 두 가지 필터#
- context:include-filter : 필터를 통해 포함시키고자 하는 대상.
- context:exclude-filter : 필터를 통해 제외시키고자 하는 대상.
이 두 가지는 모두 type, expression 속성을 갖는데, 이때 사용되는 값들은 다음과 같습니다.
| Filter | Example Expression | Description |
|---|---|---|
| annotation | org.example.SomeAnnotation | 타겟 컴포넌트의 타입 레벨에 존재하는 어노테이션을 스캔 |
| assignable | org.example.SomeClass | 지정한 타입과 할당(extends/implements)할 수 있는 클래스들을 스캔 |
| aspectj | org.example..*Service+ | aspectj의 표현식과 매치되는 컴포넌트들을 스캔 |
| regex | org.example.Default.* | 클래스 이름이 정규 표현식과 매치되는 컴포넌트들을 스캔 |
<context:component-scan base-package="최상위 패키지명" use-default-filters="false">
  <context:include-filter type="aspectj" expression="하위 패키지명" />
  <context:include-filter type="aspectj" expression="하위 패키지명" />
	...
</context:component-scan>
use-default-filters 속성#
use-default-filters은 컴포넌트 스캔을 할 것인지, 안할 것인지에 대한 옵션이며 기본값은 true입니다. true인경우 @Component, @Controller, @Repository, @Service와 같은 기본 컴포넌트를 스캔한다는 의미이며, 반대로 false는 기본 컴포넌트를 스캔하지 않는다는 것입니다.
| Option | Example Expression | Description |
|---|---|---|
| use-default-filters | true | default, 컴포넌트 스캔 사용 |
| use-default-filters | false | 컴포넌트 스캔 미사용 |
Java 에서의 component-scan 설정#
Java 파일로 직접 Bean 등록 설정#
1. Setter 방식의 Bean 주입 방식#
ApplicationConfig.java
@Configuration // Bean 설정 파일임을 알려주기 위한 어노테이션
public class ApplicationConfig {

    @Bean
    public TestRepository testRepository(){
        return new TestRepository();
    }

    @Bean
    public TestService testService(){
        TestService testService = new TestService();
        testService.setTestRepository(testRepository()); // Setter 방식의 의존성 주입
        return testService;
    }
}
2. 메소드 파라미터로 의존성 주입#
ApplicationConfig.java
@Configuration // Bean 설정 파일임을 알려주기 위한 어노테이션
public class ApplicationConfig {

    @Bean
    public TestRepository testRepository(){
        return new TestRepository();
    }

    @Bean
    public TestService testService(TestRepository testRepository){
        TestService testService = new TestService();
        testService.setTestRepository(testRepository);
        return testService;
    }
}
Java 설정 파일에 직접 Bean 등록은 XML 직접 Bean 등록의 단점과 마찬가지로 하나하나 Bean으로 등록을 해줘야합니다.
그래서 나온 개념이 Component Scan 방식입니다.
Java 파일로 Component Scan 방식 설정#
| ComponentScan option | type safe | parameter |
|---|---|---|
| basePackageClasses | Type Safe | Application.class |
| basePackages | Not Type Safe | com.spring.test |
ApplicationConfig.java
@Configuration // Bean 설정파일이다를 알려주기 위해서
@ComponentScan(basePackageClasses = Application.class)
//@ComponentScan(basePackages = "com.spring.test")
public class ApplicationConfig {

}
Application.java
public class Application {

    public static void main(String[] args) {
        // Java 파일로 ApplicationContext를 생성하기 때문에
        // AnnotationConfigApplicationContext 클래스를 사용한다.
        ApplicationContext context =
        new AnnotationConfigApplicationContext(ApplicationConfig.class);


        String[] beans = context.getBeanDefinitionNames();
        System.out.println(Arrays.toString(beans)); // ApplicationContext 안에 등록된 Bean들을 출력

        // context.getBean()을 호출하면 Object 타입이 Return되기 때문에
        // 타입 캐스팅을 해줘야한다.
        TestService testService = (TestService) context.getBean("testService");

    }
}
@Component#
IoC Container는 특정 어노테이션이 달려있는 클래스를 빈으로 만들기 위해 빈 스캐닝을 합니다.
- @Configuration
- @Bean
- @Component
- @Repository
- @Service
- @Controller
그중 @Component는 “이 클래스를 정의했으니 빈으로 등록하라” 라는 뜻으로, 개발자가 직접 작성한 Class 위에 선언하면 됩니다.
@Component
public class TestClassSample {

...

그리고 @Controller, @Service, @Repository 모두 @Component를 상속받아 컴포넌트 스캔에 의해서 자동으로 스프링 빈으로 관리가 되게 됩니다.
@Controller, @Service, @Repository#
해당 어노테이션들은 @Component를 상속 받기 때문에 Component Scan의 대상입니다.

그리고 각각의 어노테이션들을 설명하기 위해 MVC 패턴 모델을 먼저 아는 것이 중요합니다.
MVC 모델#
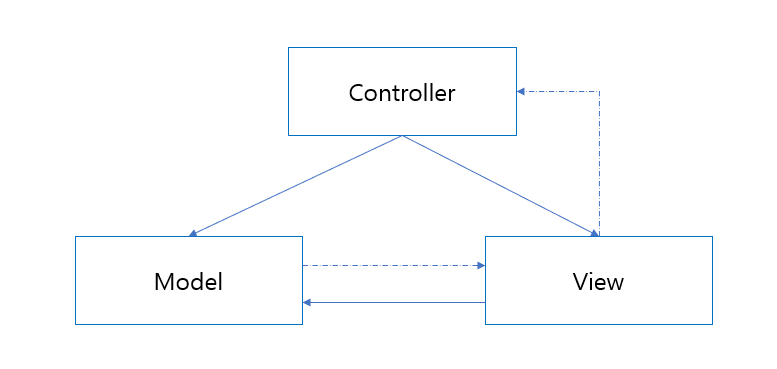
MVC 모델이란 Model, View, Controller의 약자로서 개발을 할때 3가지 역할로 나누어 개발하는 방법론입니다.

Model#
어 어플리케이션이 무엇을 할 것인지 정의하는 부분 입니다. 즉, 내부 비즈니스 로직을 처리하기 위한 역할을 합니다.
DB와 연동하여 사용자가 입력한 데이터나 사용자에게 출력할 데이터를 다룹니다. 특히 여러 개의 데이터 변경 작업을 하나의 작업으로 묶는 트랜잭션을 다루는 일도 합니다.
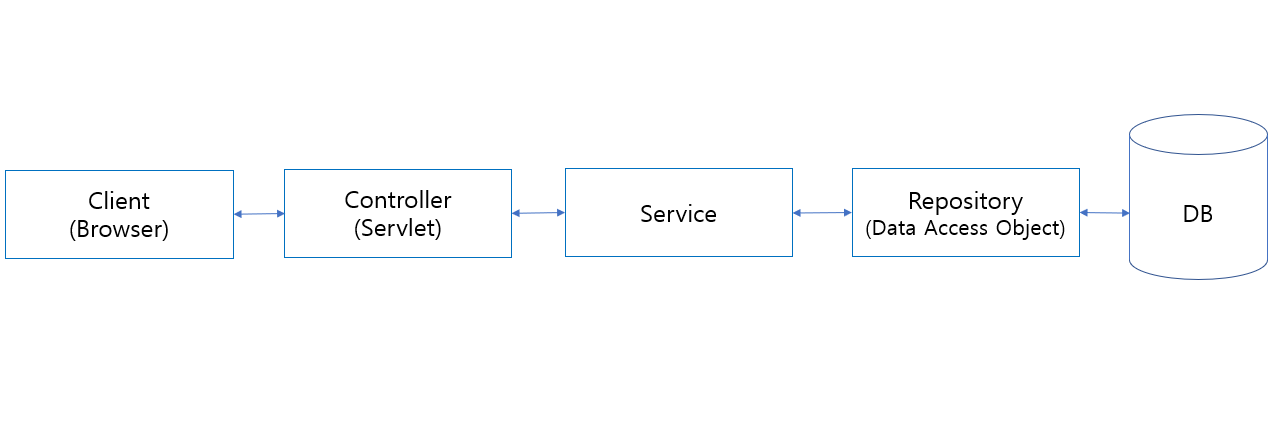
Controller 이하 Service(ServiceImpl), DAO(Repository), SQL(JPQL, Persistence)이 Model에 해당합니다.
View#
최종 사용자에게 무엇을 화면(UI)로 보여줍니다. 화면에 무엇을 보여주기 위한 역할 이며, 모델이 처리한 데이터나 그 작업 결과를 가지고 사용자에게 출력할 화면을 만듭니다. 만든 화면은 웹 브라우저가 랜더링합니다.
Controller#
Model과 View 사이에 있는 컴포넌트이며, View에서 클라이언트의 요청에 맞게 Model이 데이터를 어떻게 처리할지 알려주는 역할을 합니다. 클라이언트가 보낸 데이터가 있다면, 모델을 호출할 때 전달하기 쉽게 적절히 가공하며, Model이 로직 수행을 완료하면 그 결과를 가지고 화면을 생성하도록 View에 전달합니다.
스프링과 Controller#
스프링에서 컨트롤러를 지정해주기 위한 어노테이션은 @Controller와 @RestController가 있습니다.
두 어노테이션은 컨트롤러(*Controller.java)에 붙여두면, 컴포넌트 스캔에 의해서 자동으로 스프링 빈으로 관리가 되게 됩니다.
@Controller#
전통적인 Spring MVC의 컨트롤러인 @Controller는 주로 View를 반환하기 위해 사용합니다.
하지만 @ResponseBody 어노테이션을 같이 사용하면 RestController와 똑같은 기능을 수행할 수 있습니다.
즉, JSON/XML형태로 객체 데이터 반환을 목적으로 동작할 수 있습니다.
@RestController#
RestController는 Controller에서 @ResponseBody 어노테이션이 붙은 효과를 지니게 됩니다.
즉, 주용도는 JSON/XML형태로 객체 데이터 반환을 목적으로 합니다.
@Service#
비즈니스 로직에(*Service.java) @Service 어노테이션을 추가하면, 컴포넌트 스캔에 의해서 자동으로 스프링 빈으로 관리가 되게 됩니다.
- 비즈니스 로직이나 리포지토리 레이어를 호출하는 함수에 사용
- 다른 어노테이션과 다르게 @Component에 추가된 기능은 없음
- 비즈니스 로직에 @Service 어노테이션을 추가해야 나중에 추가적인 exception handling을 해줄 수도 있음
@Repository#
DAO(*Dao.java) 클래스 또는 JPA의 Repository(*Repository.java)에 @Repository 어노테이션을 추가하면, 컴포넌트 스캔에 의해서 자동으로 스프링 빈으로 관리가 됩니다.
또 @Component와 다르게 Exception translation 라는 특성이 추가됩니다.
Exception translation#
@Component를 사용하면, Persistence 기술(JPA 또는 Hibernate API)를 사용하면, 네이티브 예외 클래스를 처리할지 정해야합니다.
Persistence 기술에 따라 HibernateException PersistenceException의 하위 클래스를 던지겠지만, 모두 런타임 예외라 선언하거나 Catch 하지 않아도 됩니다.
던져지는 예외의 타입을 알 수 있는 방법이 없기 때문에 각각 다 예외처리 하거나 전체를 다 예외처리 해야하는 문제가 있습니다.
@Repository를 사용하여 Exception translation의 특성을 이용해 예외가 더 디테일 하게 스프링의 커스텀 예외 계층 구조로 변환하여 처리할 수 있도록 해야합니다.